Create Blend like UIs using DOCKY

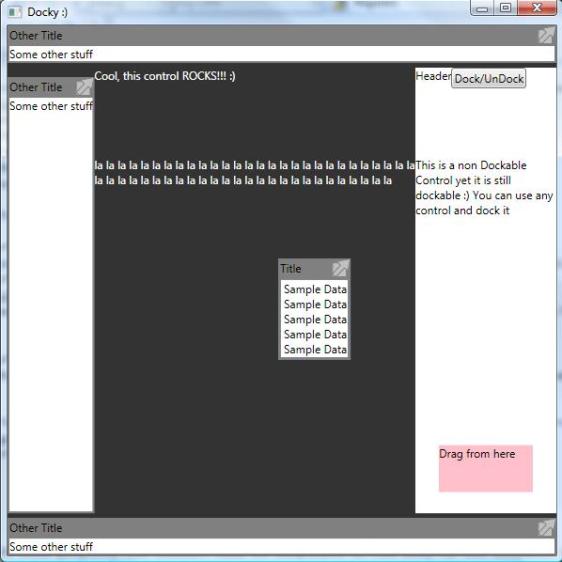
Docky is a new control for AvalonControlsLibrary. Docky is the codename for this control, the actual name for this control is DockableContainer. Basically Docky is a control that lets you add panels that can be dockable. By Dockable I mean that you can specify where the child panel (control) needs to be docked. If you un dock one of the panels then the panel can be dragged any where on screen (within the working area)

Docky

Using Docky is very similar as using a dockpanel. Like a DockPanel, Docky has an attached property called Dock which you can use to specifiy where you want your panel to be docked. If you do not specify this property Docky will dock your control in the middle ( this is a behavior like Fill). An example for using the Dock property is

< Grid local:DockableContianer.Dock=”Left” ……

Another important thing to know about Docky is how you can make your control be able to Dock and UnDock. Basically there is a command called ToggleDockChild that you can use to Dock and undock your control. This command needs a Parameter which is a reference to the control that is docked. So for example if the panel that is docked is a grid and inside it I have a button that dock and undocks the grid, I would have to pass the instance of the grid as parameter. Let me give an example

<Grid>
<Button Command=”{local:DockableContainer.ToggleDockChild}” CommandParameter=”{Binding RealtiveSource={RelativeSource AncestorType={x;Type Grid}} }”/>
</Grid>

The last thing that one has to do in order to use this control is set the ElementForDragging attached property. This property is used to let the DockableContainer know which control will be used to drag the panel when it is UnDocked. The value of this property should be set as the Panel to drag. You can put this property in any child element of the element being docked because the Docky will analyze the ViusalTree of children of the docked element and check which child has this property set. This is a useful feature for when you need to be able to drag the panel from the Middle part or bottom etc… Again I will give an example

<Grid>
<Button Command=”{local:DockableContainer.ToggleDockChild}” CommandParameter=”{Binding RealtiveSource={RelativeSource AncestorType={x;Type Grid}} }”/>

<Border local:DockableContainer.ElementForDragging=”{Binding RealtiveSource={RelativeSource AncestorType={x;Type Grid}} }“/>
</Grid>

So here what we are saying is that the surface where the user can grab to drag the panel is the Border.

Ok so there is some work to do in order to use this control, so I decided to create a control that handles all this stuff for you. The control is called DockableControl and it inherites from HeaderedContentControl. This control handles all attached properties and commands for the DockableContainer so all you have to do, is to feed the Header and the Content and all the other stuff is catered for.

I created a Demo Project for this control so that you do not need to download AvalonControlsLibrary (well in actual fact I didn’t commit the changes to codeplex yet since I am still doing some refactoring 🙂 ). Download the code for this control and see how it works to get a better idea of how one can use this control…..

If you have any problems, questions or bugs feel free to send me an email at marlongrech@gmail.com or post a comment to this post 🙂

Hope you like it …

DOWNLOAD DEMO PROJECT

Regards

Jasema V2 coming up soon…

[Jasema v2 has been released] 

Hello …..

It’s been a while since my last Post…. I am really really busy right now, so sorry guys. I hope you understand my pain 🙂

Anyway guess what Jasema V2 is coming soon…. hopefully I will do the final touches this week and post it online PROMISE…

It will be really cool !!!!

New Features

– Draw Curves (Drag drop points)
– Edit Lines (by Drag drop points)
– Optimized Geometry Generation
– Undo and Redo – Thanks to my friend Karl Agius

you’ll see soon……

P.S I am about to post a new control on my AvalonControlsLibrary as well….. DockableContainer aka Docky (Control to dock/undock control and drag drop control, something like blend UI for toolbars)

How can I concatenate a string and a Binding value in a TextBlock

[Also read this post that makes the whole thing much easier] 

So I was running around in the WPF forums as usual and I started discussing how one can concatenate a string and a Binding to a textblock… so it would be something like this

<TextBlock Text=”Hello {Binding}”/>

You don’t have to be a WPF Expert to know that this would not work…. Yet it would be quite Handy to have… so I created a small Markup Extenstion that can do this for us…. I am going to post the full source because it is quite small !

public class ConcatStringExtension : MarkupExtension
{
//Converter to generate the string
class ConcatString : IValueConverter
{
public string InitString { get; set; }

#region IValueConverter Members
public object Convert(object value, Type targetType, object parameter, System.Globalization.CultureInfo culture)
{
//append the string
return InitString + value.ToString();
}

public
object ConvertBack(object value, Type targetType, object parameter, System.Globalization.CultureInfo culture)
{
throw new NotImplementedException();
}

#endregion
}
//the value to bind to
public Binding BindTo { get; set; }
//the string to attach in front of the value
public string AttachString { get; set; }

public override object ProvideValue(IServiceProvider serviceProvider)
{
//modify the binding by setting the converter
BindTo.Converter = new ConcatString { InitString = AttachString };
return BindTo.ProvideValue(serviceProvider);
}
}

Thats’s it basically…. The Markup Extension will now modify the Binding that you specify by setting a converter that is able to attach a string infront of the value of the Binding…. So now we can do this….

<TextBlock Text=”{local:ConcatString AttachString=Hello, BindTo={Binding} }” />

Why did I decide to use a converter and set it to the binding, instead of just return the string passed (AttachString ) and the value of the binding concatenated? well very simple because of the binding…. what would happen then when the binding value changed!!! A markup extension will only spit an object for the parser yet if we modify the binding we would achieve what we what i.e that the binding still updates….

Hope you like this…. Regards

Jasema – The XAMLPadX plugin for building Path Geometry

[Jasema v2 has been released]

XAMLPadX v3 is out ! I love XAMLPadX, for me it is one of the best tools to have when developing WPF applications. One of the best features of XAMLPadX v3 is that you can build your own plugins… cool !! So basically we can be part of it!

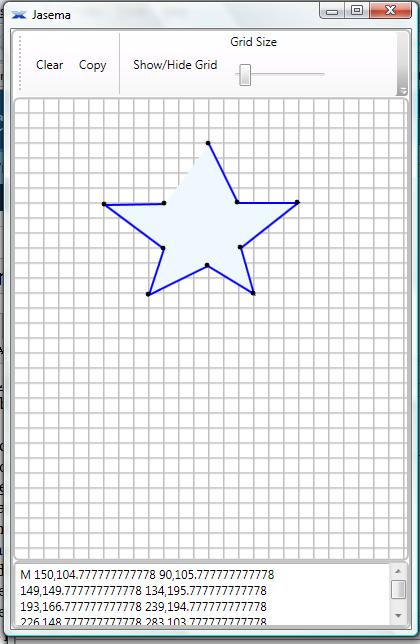
Lately I was creating some simple paths yet it took me ages to build them because I was building them manually by hand. While creating the geometry for these paths I noticed that creating a tool to build these paths would be very easy… All you have to do is record where the mouse pointer is and put it in the Data property of the Path (for more info on how to build path geometry click here). So I decided to build a tool that I can use to build these Paths more efficiently…

jasema.jpg

The tool can be integrated as a XAMLPadX plugin and also run as a standalone application. Jasema is very simplistic and only caters for straight line paths (it is only v1, I am just testing the idea) yet in the near future I will add more functionality for it in order to support much more complex Paths.

You can generate paths by click on the drawing surface provided in the tool. When a point is created the point is shown as a small dot. If you click on the dot that point will be removed from the path geometry. Another interesting and helpful feature in Jasema is the Layout Grid. The layout grid is a simple grid that is drawn on the background of the drawing surface so that you have more guidance while painting the path that you want. You can also make the grid larger or small as you prefer by using the slider menu that is provided in the tool bar.

Why did I call this tool Jasema?

well “Jas” are the first 3 letters of my daughter’s name – Jasmine
“Ema” is the name of my wife….
concatenate them …. string toolName = “Jas”+”ema”;
There you have it “Jasema”

To install this tool as a XAMLPadX plugin you will need to

First of all install XAMLPadX v3
– Create a folder called “Jasema” under “C:\Program Files\XamlPadX\Addins” (assuming that XAMLPadX v3 is installed in that directory)
– Copy the Jasema.dll and paste it in the folder that you have just created
– Thats’s it ! Now when you open XAMLPadX and click on Plugins >> More Plugins, Jasema will appear in the list and you can select it…

To run Jasema as a standalone application you can do so, by starting up the JasemaApp.exe…

Again I want to point out that this is just the start…. I have loads of ideas on how to improve this tool such as supporting more complex paths etc… I am waiting to see the feedback on this tool because at the end of the day it is just an idea, now it is up to us to expand this idea into a handy tool 🙂

PLEASE SEND FEEDBACK….

Download Full Source Code
Download DLL and Executable

How to get an Adorner layer without the use of AdornerLayer.GetAdornerLayer

Hello,

I am currently working on a plugin (I cannot give any more information about this yet I will post it on my blog shortly) using WPF. The main application that hosts all plugins uses the System.Addin (.Net 3.5 version). While developing the plugin I got into a brick wall… Basically I was calling the AdornerLayer.GetAdornerLayer, passing the instance of the plugin UI as parameter yet the method was returning a big and ugly null.

I started digging into the problem and had a look at how the Addin system works. Basically all addins are sandboxed into a seperate appdomain and there is no possible way how you can get the instance of the AdornerLayer of the main window (Or better there is no easy way of doing that) …

I solved this problem by creating an AdornerDecorator as an element in my XAML and then get the adorner layer of this AdornerDecorator. So the XAML would look something like this

<UserControl>

<AdornerDecorator Name=”myAdornerLayer”>

….other XAML here

</AdornerDecorator>

</UserControl>

Then in C# i just call the myAdornerLayer.AdornerLayer and do what ever I want with it. This solution does not help if you want an adorner layer for all the main window that is hosting your plugin, the adorner layer will ONLY cover the surface area of the plugin. Yet if you do not need the whole area of the main window but only the surface area of the plugin, this solution should work just fine ….

Hope you find this useful…

Looking forward to post the plugin online….. I am sure you will love it 😛

Best Regards

Working with Expression Trees – Part 1

So here I am at 1.00 am in the morning everyone is sleeping and finally I can enjoy some peace and quite. My brain is partially not working so I apologize if I say something stupid 🙂

Let us start…. Why is LINQ so exciting for me? That’s a good question … Well 99% of the people that know me would probably answer “It is a new .Net feature so definitely Marlon will be more than excited about it!”. Yet my friends, let me give you the answer myself! The BIG thing about LINQ is that in C# you can stop being so imperative and bossy and start being more declarative (aka goal oriented). So basically you express yourself by creating a query and then let the underlying provider to do all the work…. To understand more what I mean have a look at Linq to SQL.

So assuming that you have already seen and tried LINQ, today I will talk about how the underlying systems can read the query that you write and parse it. We will not talk about LINQ but instead we will talk about Lambdas and Expression Trees.

Func<string, bool> test = x => x.Length > 10;
Expression<Func<string, bool>> test2 = x => x.Length > 10;

Ok, so you would be wondering what is the difference between these 2 statements. Well there is quite a lot of difference.
When the compiler grabs the first statement, it will treat this line of code like a normal delegete, producing MSIL that can “run” the specified code. Yet for the second statement the compiler will build an Expression Tree so that who ever receives the “test2” can parse the expression tree and do some work. To have a better idea of what I am saying I opened my friend Reflector and disassembled the two statements.

1st Statement

CS$<>9__CachedAnonymousMethodDelegate1 = delegate (string x) {
return x.Length > 10;
};
Func<string, bool> test = CS$<>9__CachedAnonymousMethodDelegate1;

2nd Statement

Expression<Func<string, bool>> test2 = Expression.Lambda<Func<string, bool>>(Expression.GreaterThan(Expression.Property(CS$0$0000 = Expression.Parameter(typeof(string), “x”), (MethodInfo) methodof(string.get_Length)), Expression.Constant(10, typeof(int))), new ParameterExpression[] { CS$0$0000 });

Quite a big difference one can notice !

Basically the compiler has building up a set of objects that we can parse in order to do a unit of work. And that is the power of Lambda and Expression Trees

Now that we know that the compiler will give us an Expression tree let’s dive into some code. I will will create a method that accepts an expression and translates that expression into a URL. So for example we will have a user that wants a customer that has a name of ‘Marlon’ and we will give him ‘www.blablabla.com/Customer.aspx?Name=Marlon’

First let’s create the Customer class.

linq1.jpg

Now that we have the class let’s create a dummy method that will eventually be our URL provider.

linq2.jpg

So the method above accepts an Expression of type Func that has a Customer generic type and a bool as return type. The method will later parse the expression to form a URL out of it.

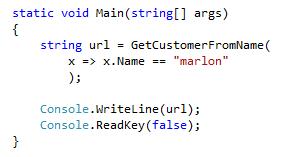
Now lets’ call this method to see how the code for the lambda would look like.

linq3.jpg

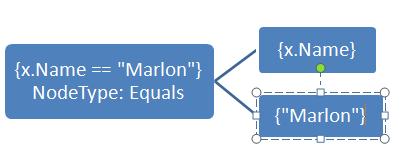
Great we have everything set up and now we can start having some fun parsing the Expression Tree (FINALLY). The expression that was passed to us contains a Body property. The body is a BinaryExpression that contains a Left property a right property and a NodeType property.
The Left property will contain the expression on the left of our lambda i.e x.Name
The Right property will contain the expression on the right of our lambda i.e “marlon”
The NodeType will contain the operation that was applied between the 2 expression (this is an ExpressionType enum ex. Equals, GreaterThan etc..)

The tree would look something like this

linqimg1.jpg

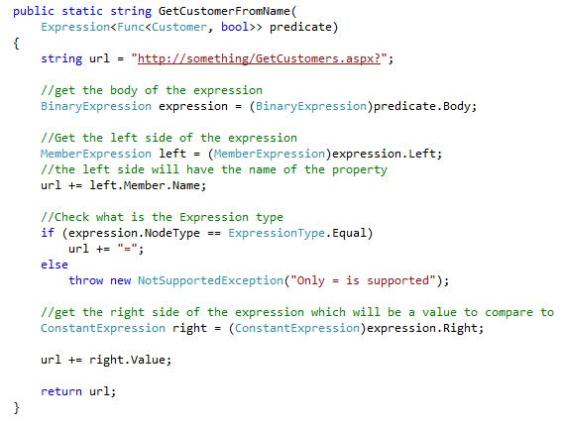
So what we need to do now is to cast the Left expression as a MemberExpression since we know that we have an expression that is accessing a Property of the object (Please note that we are doing this assumption to simplify the blog post in a Part 2 of this post I will discuss how one should recursivly cast this expression since you can have multiples). By doing so now we can access the name of the property that the lambda is calling i.e Name and we can put it in our URL. We can also cast the Right expression to a ConstantExpression that will give us the value that is on the right side of the expression i.e “Marlon”. Having said all this have a look at the code to get a better idea of what is happening

linq4.jpg

As you can see all we are doing in this method is to get the data from the expression tree and write a string accordingly. AGAIN I want to make this crystal clear, this implementation is quite Naive. There are infinite number of problems with this…. For example if the user passes an expression like this

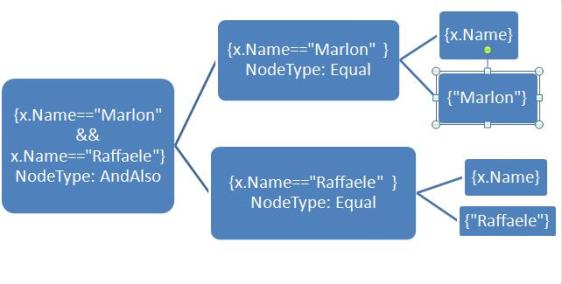
x => x.Name == “Marlon” && x.Name == “Raffaele”

Then we would get a nice Exception because the Left Expression would not be a Member expression anymore but it would be a BinaryExpression that contains the x.Name == “Marlon” and the Right expression would be the x.Name = “Raffaele”. Something like this.

linqimg2.jpg

This can go on infinitly (or maybe until the developer gets tired writing the lambda 🙂 ) and that is why recursion is needed for parsing an expression tree. I will dive into this on my next post on Expression Trees, right now I will dive into my bed because I cannot make my eyes stay opened any longer….

So guys I hope you liked the article I will be posting Part 2 where we will implement a much more complex expression parser using some recursion and god knows what not.

Download Sample Application >>

Avalon Controls Library on CodePlex

Hi all,

I am pleased to announce that the AvalonControlsLibrary  has been uploaded on CodePlex. I am looking forward to see this project evolve more and more in the near future.

Looking forward to see more suggestions for this library so that together we can make this library grow ….

Visit the CodePlex homw page here 

Thanks for all the help and support

3rd place winner at Community Credit… yahoooo

Hey Guys,

I won a cool price this month from community credit ….

3rd Prize: The Interactive Star Wars Lightsaber Game
If only you could kill Jar Jar Banks
This game plugs into a television and translates actual movement into on-screen interactive lightsaber dueling from the iconic Star Wars® movies. A spheroidal training “droid” plugs into your TV (TV not included) via an included RCA cable and wirelessly detects every movement of the lightsaber as you collaborate with on-screen representations of famous Jedi Knights such as Obi-Wan Kenobi, Qui-Gon Jinn, and Yoda to battle a host of adversaries including Jango Fett, Emperor Palpatine, and Darth Vader. At 15″ long, the lightsaber’s hilt is wide enough for two hands, but short enough for exuberant indoor play

cool aa???