Karl Shifflett has done a great job in his new XAML Power Toys. This tool can really speed up development big time. I am simple amazed at the ideas that this guy has. The actual tool really does work… I use it every day and it makes my development so much faster. So guys, if you do not have it just go and get it.
Category Archives: wpf tools
new XAMLPADX 4.0 is out now
How to test C# code without running an application
One thing that I love about scripting languages is that, to test some code you do not need to create a sample application and run that application. You can simple run the interpreter, write the code you want to test and you get the results… With compiled languages this is harder to achieve.
So whenever I need to test something, like for example let’s say I want to test what the .ToString() would give me for a DateTime object I need to create a sample application, write my code, compile and run… Quite cumbersome to test some simple code!
Enter TestDriven.Net
TestDriven.Net is a brilliant tool! This tool is a VS plugin to run Unit tests. Long story short, to run a unit test you need to right click in the Test method and Select “Run Test(s)” (shown in the image below). You also have the option to run the test with the debugger. This feature enables you to have breakpoints in your code and step through your test (to do this you must select the “Test with Debugger” option from the context menu).
Now how does TestDriven.Net fit in this article?
TestDriven.Net can be used to not only run tests but also normal code (at the end of the data, a test is still C# code). So basically if you are writing a method and you want to run some code all you have to do is to put a breakpoint inside you method, right click and select Test with Debugger and voila you are now running the code you wanted without the need to start the whole application or even worse create a sample application!
Once you are in debug mode, you can use the Immediate window to write whatever code you want to test and it will get evaluated there and then. You can also change the values of the variables that are in context from the Immediate window. What could be cooler than this 😀
Also for those that love Intellisense (well I don’t know who doesn’t !) Immediate Window also offers this feature for us developers 🙂
Another way how to achieve this functionality is by pressing F10 instead of F5 in Visual Studio. Basically when you press F10 VS will run the Application but start debugging immediately. In this way you can use the immediate window to try out the code that you wish to execute there and then 🙂
So there you have it….
This trick that I just showed, makes my life much easier and I hope that it will help you as well 😀
Have loads of coding fun….
“C# my Name, CLR my Passion” << Marlon Grech the C# Disciple
Input Prompt support in WPF
Intro
If you look at Vista User experience guide, one thing that is a must have is the Input Prompt. I think that this is very important to improve the user experience. Yet unfortunately this is not supported natively by WPF 😦
But don’t worry because AvalonControlsLibrary is at the rescue 🙂
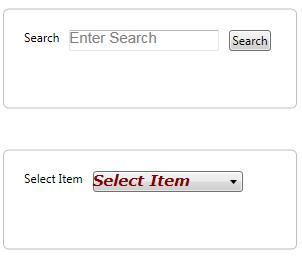
I had noting to do today so I decided to create this functionality and share it with you guys… You would say, aha; here comes Marlon with a new control. But NO. This is not a control as such. What I have created is a class with some attached properties that can be used to have the Prompt Input feature for any control (or better any control that would make sense such a feature). I choose the attached properties approach rather than creating a custom control for the simple reason to support any control that you wish to have an input prompt like the one displayed in the image below.
As you can see in the image above I am using the Input Prompt both for the TextBox and the ComboBox. And yes you can use it with any control that you want…
How to use this…
Well using this feature is quite easy, all you have to do is to set an attached property in your control. Something like this…
<TextBox local:InputPrompt.PromptText="Enter Search" />
[where local is the XAML namespace mapping]
In total there are 8 properties that you can set which are
- InputPrompt.PromptText – I guess you already figured this one out 😀
- InputPrompt.PromptColor – This is a brush used as foreground for the Prompt Text (Default: Gray)
- InputPrompt.PromptFontFamily – The font family to use for the Prompt Text (Default: Arial)
- InputPrompt.PromptFontSize – The font size of the Prompt Text (Default: 12.0)
- InputPrompt.PromptFontStretch – The font stretch to use for the Prompt Text (Default: FontStretches.Normal)
- InputPrompt.PromptFontStyle – The font style to use for the Prompt Text (Default: FontStyles.Normal)
- InputPrompt.PromptFontWeight – The font weight to use for the Prompt Text (Default: FontWeights.Normal)
- InputPrompt.PromptBackColor – This is a brush that is used to color the background of the prompt (Default: Transparent)
Please note: You must set the InputPrompt.PromptText in order for this to work all the other properties are optional. Also you must have you control under an AdornerDecorator because the InputPrompt will draw the prompt text in an adorner.
If you use the Input Prompt with a textbox the input prompt will be much more intelligent. What do I mean by this? Basically the Input Prompt handles the Text Changed event of the TextBox and if the user enters no text the prompt re appears. The same happens if the TextBox looses focus and there is no text in it. I did this behaviour for the TextBox because this is the standard behaviour for an Input Prompt for textboxes.
How does this work behind the scenes
Well it’s quite simple. Basically an Adorner is placed on top of the control which sets the Attached properties and draws the InputPrompt.PromptText. Besides drawing the text this also draws a rectangle covering the surface of the control so that as soon as the user click the control(or better mouse down on the control), the adorner disappears and the control gets activated once again.
When the InputPrompt.PromptText is set for a TextBox, the input prompt will register to the LostFocus event and the TextChanged event and make sure to display the Prompt Text if the Text of the TextBox is to empty.
Conclusion
All this will be included in AvalonControlsLibrary v3 but I decided to upload a demo as a stand alone so that you can start using this immediately.
Hope you like this and as usual I am all ears for feedback and suggestions….
Thanks
Jasema v2 Released
The wait is over……
Jasema v2 is released!!!!!!
There are loads of new features so I suggest that you check it out
Jasema V2 coming up soon…
Hello …..
It’s been a while since my last Post…. I am really really busy right now, so sorry guys. I hope you understand my pain 🙂
Anyway guess what Jasema V2 is coming soon…. hopefully I will do the final touches this week and post it online PROMISE…
It will be really cool !!!!
New Features
– Draw Curves (Drag drop points)
– Edit Lines (by Drag drop points)
– Optimized Geometry Generation
– Undo and Redo – Thanks to my friend Karl Agius
you’ll see soon……
P.S I am about to post a new control on my AvalonControlsLibrary as well….. DockableContainer aka Docky (Control to dock/undock control and drag drop control, something like blend UI for toolbars)
Jasema – The XAMLPadX plugin for building Path Geometry
XAMLPadX v3 is out ! I love XAMLPadX, for me it is one of the best tools to have when developing WPF applications. One of the best features of XAMLPadX v3 is that you can build your own plugins… cool !! So basically we can be part of it!
Lately I was creating some simple paths yet it took me ages to build them because I was building them manually by hand. While creating the geometry for these paths I noticed that creating a tool to build these paths would be very easy… All you have to do is record where the mouse pointer is and put it in the Data property of the Path (for more info on how to build path geometry click here). So I decided to build a tool that I can use to build these Paths more efficiently…
The tool can be integrated as a XAMLPadX plugin and also run as a standalone application. Jasema is very simplistic and only caters for straight line paths (it is only v1, I am just testing the idea) yet in the near future I will add more functionality for it in order to support much more complex Paths.
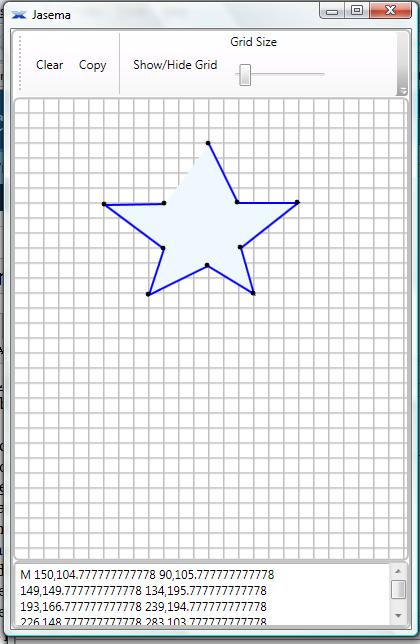
You can generate paths by click on the drawing surface provided in the tool. When a point is created the point is shown as a small dot. If you click on the dot that point will be removed from the path geometry. Another interesting and helpful feature in Jasema is the Layout Grid. The layout grid is a simple grid that is drawn on the background of the drawing surface so that you have more guidance while painting the path that you want. You can also make the grid larger or small as you prefer by using the slider menu that is provided in the tool bar.
Why did I call this tool Jasema?
well “Jas” are the first 3 letters of my daughter’s name – Jasmine
“Ema” is the name of my wife….
concatenate them …. string toolName = “Jas”+”ema”;
There you have it “Jasema”
To install this tool as a XAMLPadX plugin you will need to
First of all install XAMLPadX v3
– Create a folder called “Jasema” under “C:\Program Files\XamlPadX\Addins” (assuming that XAMLPadX v3 is installed in that directory)
– Copy the Jasema.dll and paste it in the folder that you have just created
– Thats’s it ! Now when you open XAMLPadX and click on Plugins >> More Plugins, Jasema will appear in the list and you can select it…
To run Jasema as a standalone application you can do so, by starting up the JasemaApp.exe…
Again I want to point out that this is just the start…. I have loads of ideas on how to improve this tool such as supporting more complex paths etc… I am waiting to see the feedback on this tool because at the end of the day it is just an idea, now it is up to us to expand this idea into a handy tool 🙂
PLEASE SEND FEEDBACK….


